October 2017
Are You Using QuickBooks Online's Mobile App?
Even if you don’t travel for work (but especially if you do), you should explore what QuickBooks Online’s mobile app has to offer.
You already know how convenient it is to be able to access your company’s financial data from any desktop or laptop computer that has an internet connection. Still, there are times when you’d like to be able to complete some of your accounting tasks without firing up a full-blown browser and logging on to QuickBooks Online.
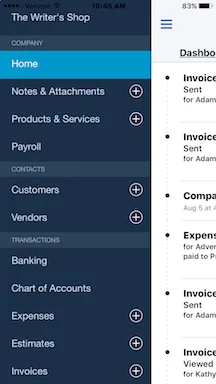
If you haven’t yet tried out the site’s companion mobile app, you might be surprised at how much you can actually accomplish on your smartphone. Take a look at the app’s main menu (with a partial view of the Activity screen below):
Here’s how it would work. Click the + (plus) sign in the upper right corner of the screen and select Vendors | Vendor Credit. A screen like the partial one pictured above would appear. These are the fields you would need to complete:
Vendor – Click the down arrow in the field in the upper left corner and select the correct vendor, or + Add New.
Payment date – Change the default date if it’s not correct.
Ref no. – Enter a reference number if applicable.
Under Account details, click in the field under Account, and open the drop-down list by clicking the down arrow on the right. Select the account you used when you created the original expense. Enter a Description and the Amount of the credit.
You can add a Memo in the box at the bottom of the screen if you’d like, and select any Attachments to include from your file directories. Otherwise, click Save and close or Save and new.
Additional Input
There’s much more to the Vendor Credit screen that you didn’t need to consider for this example. The row where you entered Account, Description, and Amount contains several additional fields that you may need to complete in some cases. They are Billable, Markup %, Tax, Customer, and Class. If you’re not sure when these fields are required, ask us to go over these concepts with you.
There’s also another section under Account Details you may need to address: Item Details (click the arrow to open if necessary). You would only enter information here if you’re returning items to a vendor. Fields displayed there include Product/Service, Qty (quantity), Rate, and Sales Amt (amount). We don’t recommend that you do this the first time on your own; let us help.
Using Your Credit
How do you redeem this credit? QuickBooks Online reminds you to use it.
You can’t do everything on QuickBooks Online’s smartphone app that you can do in the browser-based version, but there’s a surprising amount of functionality here.
Once you’ve downloaded the app and signed in with your QuickBooks Online user name and password, you’ll see a home page divided into two vertical sections; you can toggle back and forth between them. One is your Dashboard, which displays current account balances and a graph showing an abbreviated version of your Profit and Loss report, as well as a graphical summary of paid and unpaid invoices. Click on Activity to see a list of your most recent actions and transactions.
Click on the three horizontal lines in the upper left of the screen, and the app’s main menu slides out. As pictured in the image above, this interactive list also serves as the app’s primary navigation tool. Any data that you’ve entered in the browser-based version (as well as anything you add here) will appear in list form when you click on an entry here. To add customers, invoices, sales receipts, etc., click on the + (plus) sign. You can also enter new transactions from each individual list screen.
Adding Transactions
If you’ve worked with mobile apps at all, you know that the user interface is different from what you see in full versions of applications accessed through a browser. QuickBooks Online’s app, though, is exceptionally easy to understand and use – perhaps even easier than the browser-based QBO.
Take the app’s New Expense screen, for example. At the top of the page is a camera icon. Click it to take a picture of a receipt. You can also enter the total manually in a field to the right. Below that are three buttons representing Credit, Check, and Other, so you can indicate how you paid for the purchase.
You’ll describe the expense by clicking on links that contain labels like:
· Who did you pay?
· What kind of expense is this?
· Who was it for?
When you click on one, the app opens your list of related data. So, Who did you pay? opens your list of Payees. You can select one or add a new one. Click on the Billable button if the expense can be charged to a customer, and click Add a Split if you need to separate some of the items. There’s also room to add a Ref # and Memo. When you’re done, click Save to add it to your main QuickBooks Online file.
Viewing Existing Information

Besides entering data in the QuickBooks Online app, you can look up existing information.
You can just as easily find records and transactions you’ve entered either in the browser-based version of QuickBooks Online or on the app. You can follow the journey of an invoice as pictured in the screen shot above. QBO even prompts you to complete steps you haven’t taken. Click on the pencil icon in the upper right, and you can edit the data that appears on that screen.
Warning! Editing transactions that have been processed is risky. If you’re making errors that need correcting, we can help you determine when this is safe.

The QuickBooks Online app can also provide quick overviews of customer activity, with links to actions.
You may never need to access your QuickBooks Online data remotely on your smartphone. If you do, though, we can help you get set up with the site’s companion app so you’ll learn how they work together